需求分析与实现规划
引子
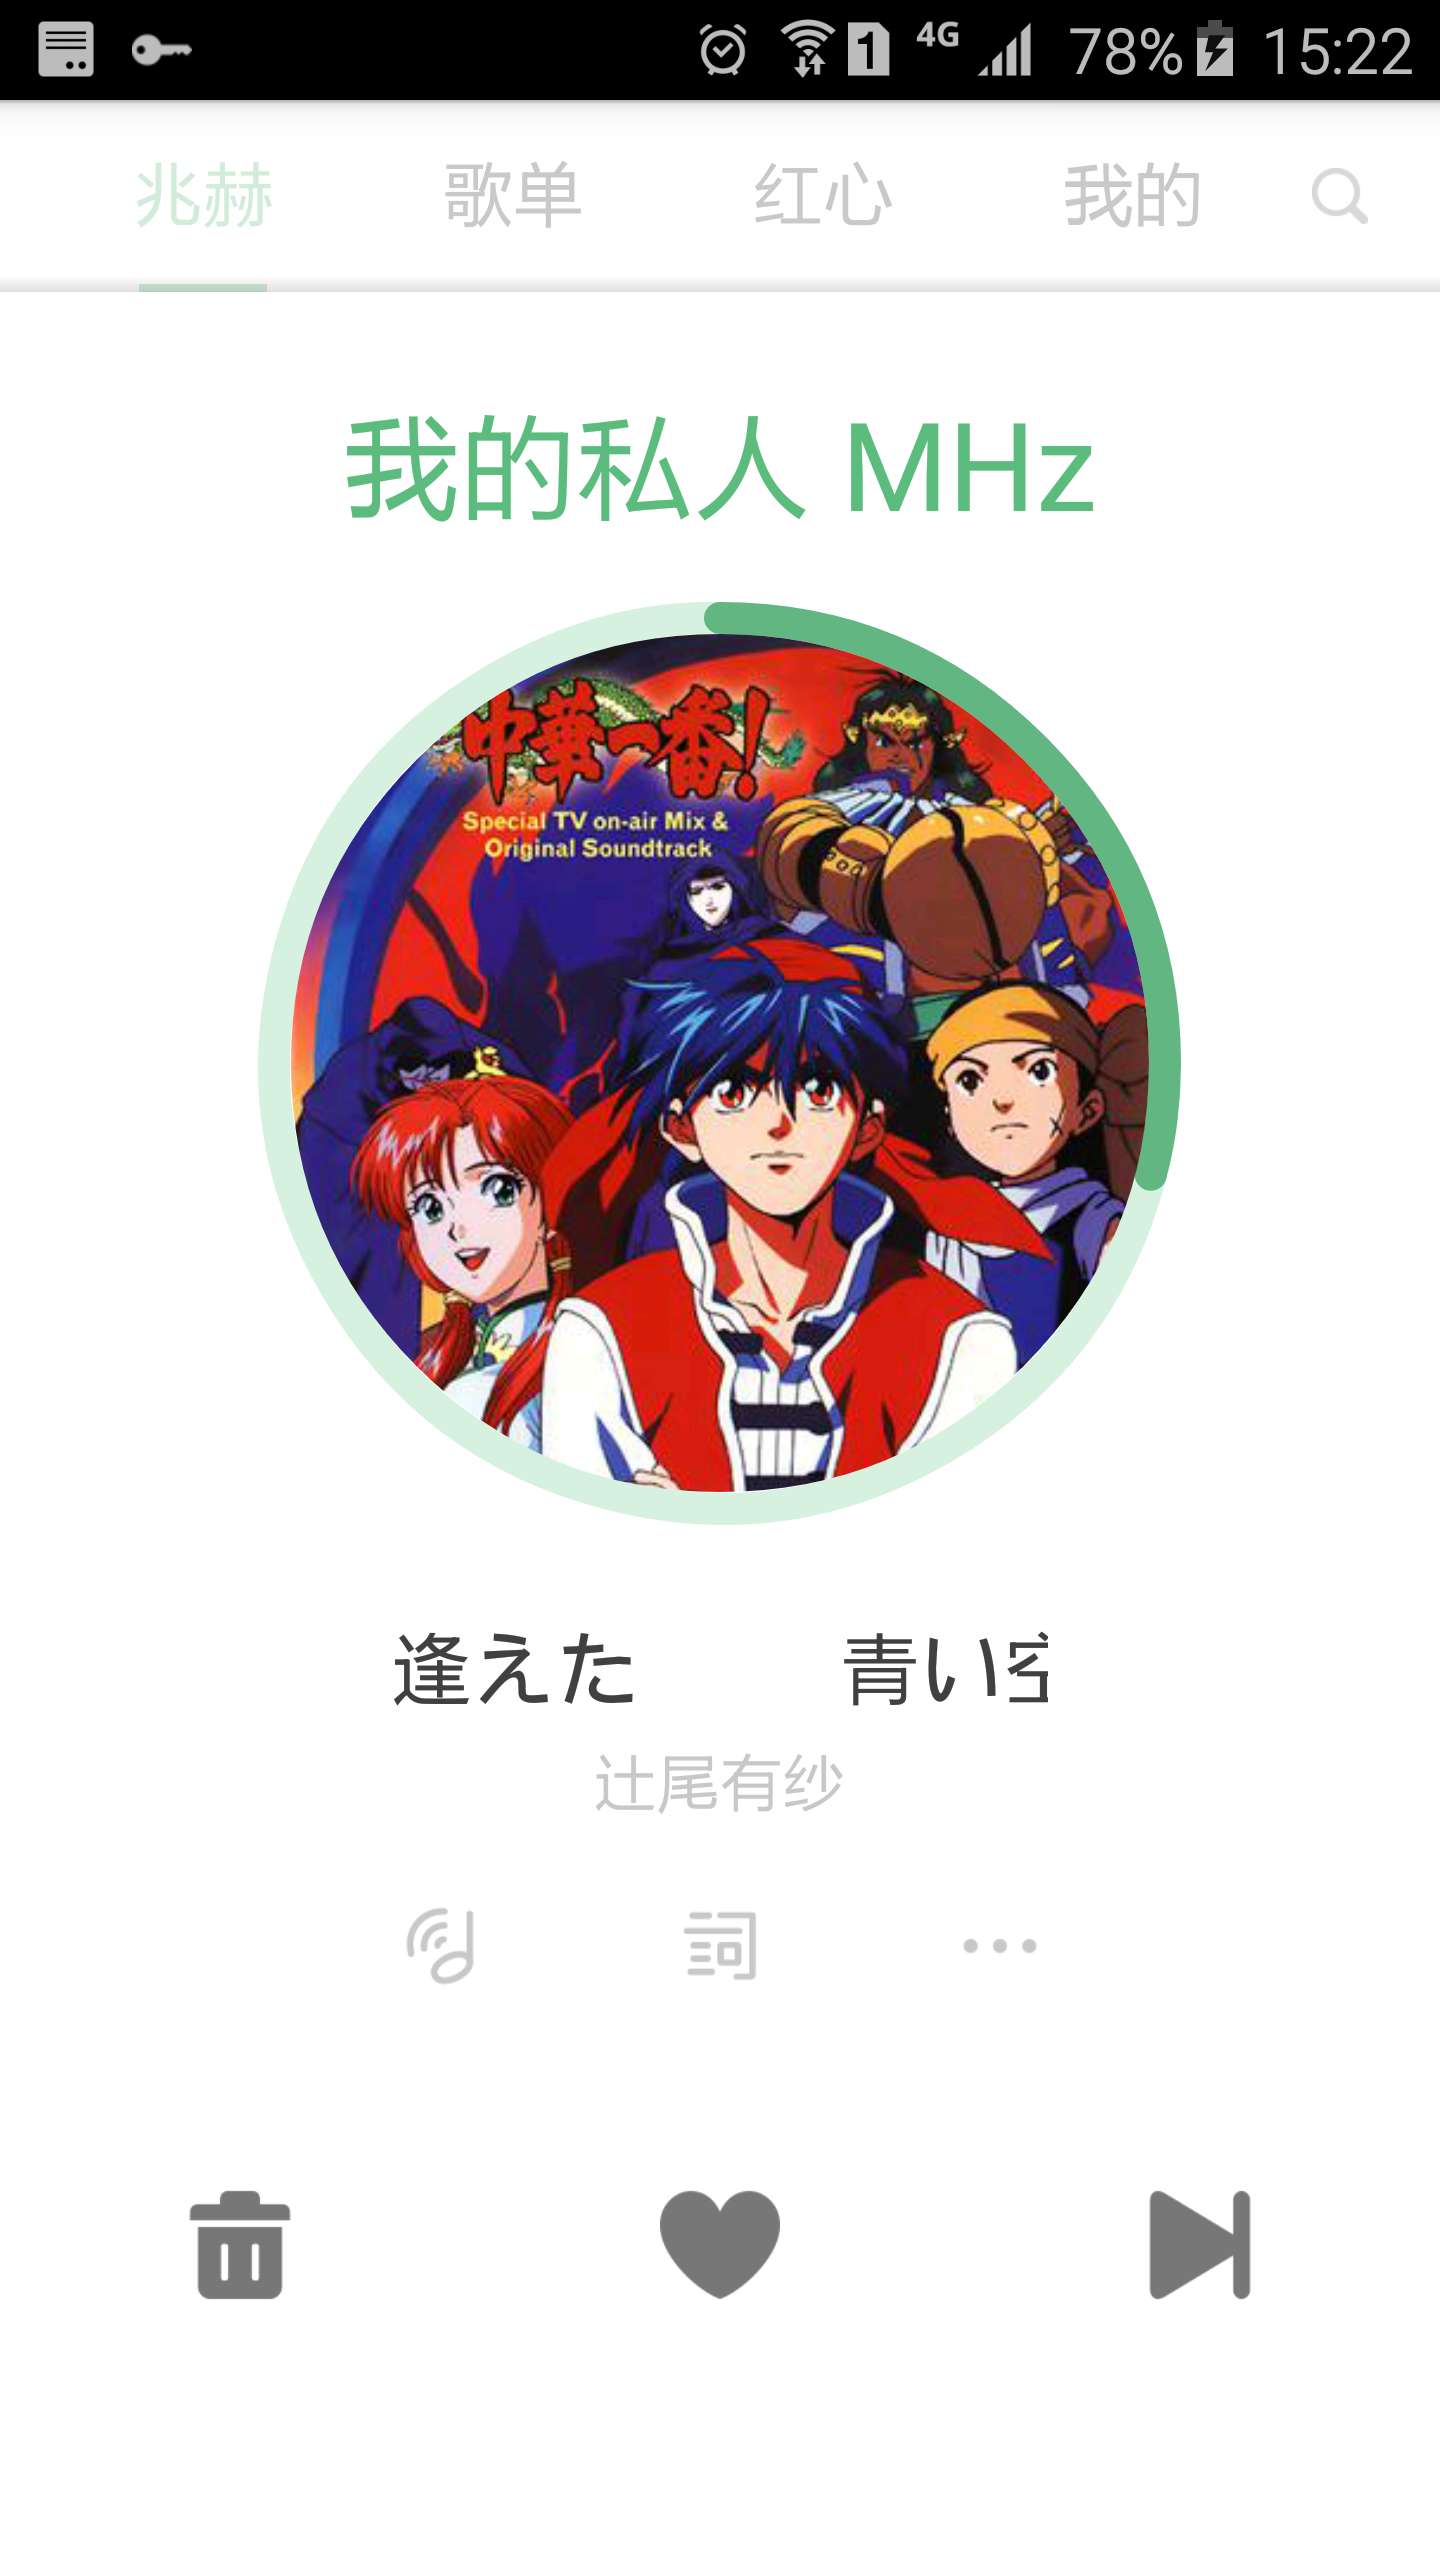
前段时间看到了豆瓣FM的音乐播放界面,有一个环形的进度条,非常的好看,于是想了想,为什么不自己做一个呢,于是就开始了自定义的过程
豆瓣FM的播放界面如下图:

功能分析
虽然功能比较简单,但是仍然需要仔细分析
1.图标外还有一圈圆圈,可以设置宽度
2.圆形进度条和进度条底部,可以设置宽度,颜色等
3.内部有一个圆形图片,可旋转
实现思路分析
1.可以设置宽度的圆圈
这个比较容易,直接在onDraw方法中使用canvas绘制即可,当然,在间距和半径的处理上需要仔细,控件本体其实还是一个长方形,我们需要选取较短的那一边作为直径,同时也要处理内部的padding
2.圆形进度条和进度条底部,可以设置宽度,颜色等
这个可以用canvas的drawArc方法来实现,通过绘制不同长度的弧形来达到显示进度的目的,但是需要注意的是,我们需要计算好弧形的半径以及开始和结束点。
3.内部有一个圆形图片,可旋转
这个需求可以分为三个部分,有图片,圆形,可以旋转
先说有图,很简单,canvas的drawbitmap方法绘制(canvas真是好东西)
再说圆形,这就比较复杂了,但是整体来说依然是使用canvas来对bitmap进行操作,会在代码中细说
最后是可以旋转,我们可以通过canvas的rotate方法来做。
效果展示
说了这么多,那么最后的效果是怎样的呢?毕竟空口无凭,在进入代码展示的环节之前还是看看最后的效果吧。
这是我自己做的一个定时锁屏的项目,地址是
这里是地址
这是这个项目运行锁屏的时候的动图(大家都喜欢动图)
代码实现
下面开始展示代码,并加以分析
我们主要的工作是在一个自定义的view中的onDraw方法实现的,所以,我们需要有一个继承View类的子类,我们就叫他MyProgress吧
我们展示的就是这个MyProgress的onDraw方法
1.可以设置宽度的圆圈
很简单,我们只需要调用canvas的drawCircle方法即可,但是需要注意对padding的处理,因为不处理就会无效
super.onDraw(canvas);  //需要在函数开始的地方调用父类的onDraw

        final int paddingLeft = getPaddingLeft();
        final int paddingRight = getPaddingRight();
        final int paddingTop = getPaddingTop();
        final int paddingBottom = getPaddingBottom();  //获取padding

        //get the view's width and height and decide the radiu
        int width = getWidth() - paddingLeft - paddingRight;
        int height = getHeight() - paddingTop - paddingBottom;
        radiu = Math.min(width , height) / 2 - boundWidth - progressWidth;  //计算半径,选取长宽中短的那个做处理,boundWidth是圆圈的宽度,progressWidth是进度条的宽度

        //setup the paint
        paint.setStyle(Paint.Style.STROKE); //设置paint为画轮廓
        paint.setStrokeWidth(boundWidth);   //设置宽度
        paint.setColor(Color.BLACK);        //设置颜色

        //draw the inner circle
        int centerX = paddingLeft + getWidth()/2;
        int centerY = paddingTop + getHeight() / 2;  //计算圆的中心点
        canvas.drawCircle(centerX,centerY, radiu, paint);  //绘制圆形
2.圆形进度条和进度条底部,可以设置宽度,颜色等
这里需要注意的就是开始的角度和结束的角度了,为了达到进度条目的,所以我们需要随着业务状态的改变来改变这个值
        //set paint for arc
        paint.setStrokeWidth(progressWidth);
        paint.setStrokeCap(Paint.Cap.ROUND);//设置进度宽度,设置末端是一个圆弧

        //prepare for draw arc
        RectF oval = new RectF();
        oval.left = centerX -totalRadiu ;
        oval.top =centerY- totalRadiu ;
        oval.right =  centerX + totalRadiu;
        oval.bottom = centerY+ totalRadiu; //新建一个椭圆,设置其四个点的坐标
        paint.setColor(progressBackColor);//设置进度条背景的颜色

        //draw background arc
        canvas.drawArc(oval, arcStar, arcEnd, false, paint); //绘制底部的一个圆弧,作为背景

        //draw progress arc
        paint.setColor(progressColor);//设置进度条的颜色
        canvas.drawArc(oval, arcStar, progress, false, paint);//绘制进度条
3.内部有一个圆形图片,可旋转
这一段比较复杂,直接用代码解释
       float  totalRadiu = radiu +boundWidth  +progressWidth/2;//设置外径

        //draw the circlr pic
        if (drawable != null&&bitmap == null) {
            image = ((BitmapDrawable) drawable).getBitmap();//获取设置的bitmap资源

            bitmap = Bitmap.createBitmap((int)(2*totalRadiu),(int)(2*totalRadiu), Bitmap.Config.ARGB_8888);
            Canvas bitmapCanvas = new Canvas(bitmap);//新建一个bitmap并新建一个canvas用以操作

            Paint bitmapPaint = new Paint();
            bitmapPaint.setAntiAlias(true);//新建一个paint并设置反锯齿

            bitmapCanvas.drawCircle(totalRadiu, totalRadiu, radiu, bitmapPaint);//画一个圆

            bitmapPaint.setXfermode(new PorterDuffXfermode(PorterDuff.Mode.SRC_IN));//关键代码,设置为交集模式,会让后面的内容和已有内容取交集
            bitmapCanvas.drawBitmap(image,null,new RectF(0,0,2*totalRadiu,2*totalRadiu) , bitmapPaint);//绘制自己的图片到现有画布上

        }
        Rect rect = new Rect((int)(centerX -totalRadiu),(int)(centerY-totalRadiu),(int)(centerX+totalRadiu),(int)(centerY+ totalRadiu));//新建一个rect,设定边界点
        canvas.save();
        if(isRotate)
        canvas.rotate(rotateDegree,centerX,centerY);//设置旋转,为了实现图片转动效果,rotateDegree为旋转角度
        canvas.drawBitmap(bitmap,null ,rect, paint);//绘制处理过的图片
有了上面这些代码,我们自定义View的主体部分就完成了,当然还有一些辅助的部分,比如更新进度和选择角度的函数,设置一些颜色和宽度之类的参数等
完整代码
MyProgress
public class MyProgressBar extends View {
    float progress = 360;
    float arcStar = 270;
    float arcEnd = 360;
    double rotateStep = 0.2;
    Bitmap bitmap;
    int totalTime;
    Bitmap image;
    Drawable drawable;
    int boundWidth = 5;
    private int progressWidth = 30;
    private boolean isRotate = false;
    private int progressColor = Color.GREEN;
    private int progressBackColor = Color.GREEN;
    private float rotateDegree = 0;


    public MyProgressBar(Context context) {
        super(context);
    }

    public MyProgressBar(Context context, AttributeSet attrs) {
        super(context, attrs);
    }

    public MyProgressBar(Context context, AttributeSet attrs, int defStyleAttr) {
        super(context, attrs, defStyleAttr);
    }

    private float radiu;
    private Paint paint = new Paint(Paint.ANTI_ALIAS_FLAG);

    public void setRadiu(float radiu) {
        this.radiu = radiu;
        invalidate();
    }
//start 函数使用 countDownTimer类来更新progress和旋转角度
    public void start(long time) {
        bitmap = null;

        time *= 60000;
        final float step = (float) 360 / (time / 30);
        CountDownTimer mTimer = new CountDownTimer(time, 30) {
            public void onTick(long millisUntilFinished) {
                progress -= step;
                rotateDegree -= rotateStep;
                invalidate();
            }

            @Override
            public void onFinish() {
                end(step);
            }

        };
        mTimer.start();
    }

    private void end(float step) {
        progress -= step;
        invalidate();
        progress = 0;
        rotateDegree = 0;
        invalidate();
    }

    public void setBoundWidth(int width) {
        boundWidth = width;
    }

    public void setProgressWidth(int width) {
        progressWidth = width;
    }

    public void setProgressColor(int color) {
        progressColor = color;
    }

    public void setProgressBackColor(int color) {
        progressBackColor = color;
    }

    public void setDrawable(Drawable drawable) {
        this.drawable = drawable;
        invalidate();
    }
    public void setIsRote(boolean rotate)
    {
        this.isRotate = rotate;
        invalidate();
    }

    @Override
    protected void onDraw(Canvas canvas) {
        super.onDraw(canvas);

        final int paddingLeft = getPaddingLeft();
        final int paddingRight = getPaddingRight();
        final int paddingTop = getPaddingTop();
        final int paddingBottom = getPaddingBottom();

        //get the view's width and height and decide the radiu
        int width = getWidth() - paddingLeft - paddingRight;
        int height = getHeight() - paddingTop - paddingBottom;
        radiu = Math.min(width , height) / 2 - boundWidth - progressWidth;

        //setup the paint
        paint.setStyle(Paint.Style.STROKE);
        paint.setStrokeWidth(boundWidth);
        paint.setColor(Color.BLACK);

        //draw the inner circle
        int centerX = paddingLeft + getWidth()/2;
        int centerY = paddingTop + getHeight() / 2;
        canvas.drawCircle(centerX,centerY, radiu, paint);


        float  totalRadiu = radiu +boundWidth  +progressWidth/2;

        //draw the circlr pic
        if (drawable != null&&bitmap == null) {
            image = ((BitmapDrawable) drawable).getBitmap();

            bitmap = Bitmap.createBitmap((int)(2*totalRadiu),(int)(2*totalRadiu), Bitmap.Config.ARGB_8888);
            Canvas bitmapCanvas = new Canvas(bitmap);

            Paint bitmapPaint = new Paint();
            bitmapPaint.setAntiAlias(true);

            bitmapCanvas.drawCircle(totalRadiu, totalRadiu, radiu, bitmapPaint);

            bitmapPaint.setXfermode(new PorterDuffXfermode(PorterDuff.Mode.SRC_IN));
            bitmapCanvas.drawBitmap(image,null,new RectF(0,0,2*totalRadiu,2*totalRadiu) , bitmapPaint);


        }
        Rect rect = new Rect((int)(centerX -totalRadiu),(int)(centerY-totalRadiu),(int)(centerX+totalRadiu),(int)(centerY+ totalRadiu));
        canvas.save();
        if(isRotate)
        canvas.rotate(rotateDegree,centerX,centerY);
        canvas.drawBitmap(bitmap,null ,rect, paint);

        canvas.restore();
        //set paint for arc
        paint.setStrokeWidth(progressWidth);
        paint.setStrokeCap(Paint.Cap.ROUND);

        //prepare for draw arc
        RectF oval = new RectF();
        oval.left = centerX -totalRadiu ;
        oval.top =centerY- totalRadiu ;
        oval.right =  centerX + totalRadiu;
        oval.bottom = centerY+ totalRadiu;
        paint.setColor(progressBackColor);

        //draw background arc
        canvas.drawArc(oval, arcStar, arcEnd, false, paint);

        //draw progress arc
        paint.setColor(progressColor);
        canvas.drawArc(oval, arcStar, progress, false, paint);
    }

}
完整的工程,包括对这个自定义VIEW的应用例子可以参考我在GitHub上的工程地址在
这里
几点总结
这个看似简单的自定义View的制作当中还是遇到了不少值得思考的问题,这也是为什么有这篇文章的原因
1.在处理圆形剪裁图片的时候,要注意剪裁的canvas所用的坐标是相对于处理图片的,而不是整体坐标
2.在绘制时,应该尽量减少重复的处理,比如圆形图片剪裁,一次就够了,如果次数过多,每次更新进度的时候就会去进行一次,导致整个View比较卡,进度不准确
3.对于自定义View中几个关键点的坐标,应该用一个比较简单易懂的表达式表示,否则做到后期会搞混淆,而陷入坐标的泥潭之中
4.某些看起来很厉害的效果只要合理分析,分步实现,并不会很难